
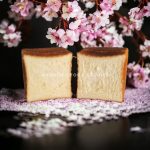
Shokupan bread – you may have heard of it, or maybe you’re already a fan of this soft, fluffy Japanese delight. In a world full of different bread types, Shokupan stands out with its melt-in-your-mouth texture and iconic square shape.
But it’s more than just a tasty treat; Shokupan holds a special place in Japanese culture, where it’s a common sight in homes and bakeries. And it’s not just popular in Japan—people everywhere are discovering how amazing it is. I’ve loved Shokupan since I was little. There’s something so comforting about toasting it just right and spreading butter or condensed milk on top. It turns a simple slice into something special. Every bite takes me back to my childhood, bringing a wave of nostalgia that makes it even more enjoyable.
My Shokupan-making journey started unexpectedly during a casual hangout with a mommy friend. It had been on my cooking bucket list for ages, but with everything going on in life, it always got pushed to the back burner. Finally, I figured it was time to give it a go. And wow, it turned out to be a total kitchen revelation – just some flour, milk, and a little bit of good company coming together to create something seriously delicious.
Since that day, the desire to perfect Shokupan has stayed with me. Over the past year, I’ve focused on getting the hang of baking this amazing bread and even developed my own special recipe. Health challenges slowed me down a bit, but in the end, I created something I truly love – and it’s become a family favourite too. I’m excited to share not just a recipe, but a journey filled with discovery, family moments, and the satisfaction of making something special, just the way my loved ones love it – soft, fluffy, and sweet.
Let’s Get to Know Shokupan Bread
Shokupan, often hailed as the “Japanese milk bread,” is not just your regular loaf. Originating in Japan, its name roughly translates to “eating bread” or “meal bread.” Picture a bread that’s not just a side but a centrepiece on the table, especially during family meals. It embodies a cultural significance, symbolizing warmth, comfort, and tradition in Japanese households.
Let’s take a closer look at the magic behind Shokupan’s dough. It all starts with flour, usually a high-protein bread flour, which forms the base. Milk adds richness, giving the bread its signature softness and a touch of sweetness. Then, yeast works its rising magic, and sugar helps balance and enhance the flavours. Together, these ingredients create a doughy masterpiece just waiting to be baked. But the real secret behind Shokupan’s soft, melt-in-your-mouth texture is the Tang Zhong method—a Japanese technique that uses a water roux to lock in moisture. This little trick makes all the difference, turning ordinary bread into something extraordinary.
Now, let’s talk about what makes Shokupan stand out in the crowded world of bread. First off, it’s the softness. Shokupan isn’t just soft; it’s cloud-soft, thanks to the magic of Tang Zhong. Imagine biting into a pillow – that’s the kind of softness we’re talking about. This comes from not just the Tang Zhong method, but also careful kneading, precise proofing, and the perfect balance of ingredients. Then, there’s the mild sweetness. Shokupan isn’t overly sweet, but it has just the right hint of sweetness, making it incredibly versatile – great on its own or as a base for spreads and fillings.
Mastering the Art of Shokupan at Home
Baking shokupan at home can be a rewarding experience, but achieving that perfect soft and fluffy texture requires attention to detail. Here are some tips and tricks to help you master the art of baking shokupan in your own kitchen:
- Use High-Quality Ingredients:
- Opt for high-quality bread flour for the best texture.
- If possible, use full-fat milk for a rich and creamy flavour.
- Tangzhong Method:
- Employ the Tangzhong method to enhance the bread’s softness. To do this, mix a portion of the flour with water or milk and cook it until it forms a thick, gel-like paste. Allow it to cool before incorporating it into the dough.
- Proper Kneading:
- Knead the dough thoroughly to develop gluten and create the desired structure. Use a stand mixer with a dough hook or knead by hand until the dough becomes elastic and smooth.
- Fermentation Time:
- Allow the dough to undergo sufficient fermentation. This helps to develop flavour and contributes to the bread’s light and airy texture. Be patient, as rushing this step may result in a less fluffy end product.
- Temperature Control:
- Maintain an ideal temperature during the entire baking process. Too high or too low temperatures can affect the yeast activity and the final texture of the bread.
- Shaping Techniques:
- Pay attention to the shaping of the dough. For shokupan, a square or rectangular shape is common. Ensure the dough is evenly shaped for uniform slices.
- Second Proofing:
- After shaping the dough, let it undergo a second proofing. This step is crucial for achieving the desired light and fluffy texture. Cover the dough with a damp cloth to prevent it from drying out during proofing.
- Baking Time and Temperature:
- Preheat your oven properly before baking. Follow the recommended temperature and baking time in your recipe. Overbaking can result in a dry loaf, so monitor the bread closely.
- Introduce steam into the oven during the first part of the baking process. This helps to create a thin, crisp crust while keeping the inside moist and soft. You can achieve this by placing a pan of hot water in the oven or by using a dedicated oven steam function.
- Cooling Process:
- Allow the shokupan to cool completely on a wire rack before slicing. This helps to set the structure of the bread and prevents it from becoming gummy.
- Experiment with Flavours:
- Get creative with flavours. You can add matcha powder for a green tea twist or incorporate other ingredients like honey, chocolate chips, or dried fruits for a unique variation.


Remember, baking is as much about practice as it is about following a recipe. Don’t be afraid to experiment and adjust based on your preferences. With patience and attention to detail, you’ll be able to enjoy homemade Shokupan that rivals the best bakery versions.
In the world of bread, shokupan stands out as a masterpiece of Japanese baking. Its softness, subtle sweetness, and versatility have made it a global favourite. Whether you’re slapping some butter on a slice or diving into the world of creative recipes, Shokupan isn’t just a fleeting trend—it’s here to stay. So, embrace your inner baker, get those creative juices flowing, and whip up some delightful Shokupan magic!
Shokupan
Ingredients
Tang Zhong
- 30 g flour
- 140 g milk
Bread Rolls
- 375 g bread flour
- 3 g salt
- 60 g sugar
- 6 g yeast (2 tsps)
- 140 g lukewarm milk
- 65-70 g butter (add in a bit at a time)
Egg Wash
Instructions
Stand Mixer Instructions:
- In a bowl, mix lukewarm milk (140g) with a pinch of sugar and add the yeast (6g). Let it sit for about 5-10 minutes until it becomes frothy.
- In a small saucepan, whisk together flour and milk for Tang Zhong. Cook over medium heat, stirring continuously until it forms a thick, pudding-like consistency. Set aside to cool.
- In the bowl of your stand mixer, combine 375g bread flour, 3g salt, 60g sugar (or 30g for savoury), and 6g yeast. Mix briefly to combine.
- Pour in the lukewarm milk (140g) and the cooled Tang Zhong. Mix on low speed until the ingredients come together.
- With the mixer running, gradually add the butter (50g) in small increments. Allow each addition to incorporate before adding more. Continue to knead until the dough is smooth and elastic.
- Place the dough in a lightly oiled bowl, cover it with a clean cloth, and let it rise in a warm place for about 1 hour or until it has doubled in size.
- Punch down the risen dough. Divide into three equal parts and and shape each part into a rectangle. Roll each rectangle tightly into a log and place them seam side down in a greased loaf pan.
- Cover the loaf pan with a damp cloth and let the dough rise for another 1-2 hours until it reaches the top of the pan.
- Preheat your oven to 350°F (175°C) during the last 20 minutes of the second rise.
- Bake the Shokupan in the preheated oven for 25-30 minutes or until the top is golden brown, and the bread sounds hollow when tapped.
- Allow the Shokupan to cool in the pan for a few minutes, then transfer it to a wire rack to cool completely before slicing.
- Slice, toast, or savour your homemade Shokupan as you like! It's perfect for sandwiches, toast, or just on its own.